
If your PC is refusing to boot itself, then probably you’ve landed with some major laptop issues. When your PC is not starting up, then it’s challenging to locate the source of the problem. This might seem like a significant issue but be rest assured that you can come out of it. Even if things are looking bleak for your laptop, there are plenty of fixes to try.
You’re in luck because we’ve got some tried and tested methods to fix starting issues in a PC. This guide will help you seek the culprit behind all the booting and starting issues in your PC. Let’s not waste any more time and get to fixing your laptop.
Check Your Laptop’s Battery
If your laptop is throwing tantrums while booting, the battery may be a reason behind it. You must test your PC with an alternate charge and a power source. You can also confirm by plugging your charger with another laptop. Alternatively, please remove the battery from your computer, and try it on another laptop.
This will help you to understand whether the reason behind the booting problem is hardware-oriented or not. To locate the source of the problem accurately, you must test one thing at a time. If the power is interfering in the booting process, then it’s imperative to know the element that needs replacement. Accordingly, you might have to change your battery, charging cable, or another aspect that is causing the problem.
Repair Update
This process is similar to factory reset, but this process completely reinstalls your PC. Unfortunately, this process can be a bit longer due to the intricate steps involved. You will require a stable internet connection and a Windows PC. The Windows Operating System takes a lot of time to download.
This method needs a Wi-Fi connection, USB or DVD, and a functioning computer. You have to download and then run the Windows DVD/USB download tool. You also have to develop a bootable installer. If you’ve never tried this method, then you can watch a few useful videos on Youtube for better guidance.
Try Dodging The Bootloader
If you’ve run into a booting problem while installing a new version of Windows, then you may face the new version of the bootloader. This will many times interfere while you’re trying to reach an existing operating system installation. Thankfully, this is quite a straightforward remedy for booting issues. You have to use the Windows installation media and then the command prompt to boot your laptop.
Open a command prompt, and to repair the boot codes, run the following command:
BOOTREC /FIXMBRTo repair the boot sector, run the following command:
BOOTREC /FIXBOOTAfter entering the command, you have to restart your computer. You will notice that the legacy bootloader has been overruled by the new Windows 10 version. You will have no further issues while accessing the old operating system. This is a relatively simple method that works during most booting issues.
Try The Windows Safe Mode
One of the most unusual yet bizarre troubleshoot for boot problems in Safe Mode. The safe mode is an alternative booting scheme that starts the PC with a minimum amount of software. This modified and advanced booting process can dodge through software problems and the driver. Many people have successfully fixed boot problems by starting the laptop in Safe Mode.
A few people might face troubles while entering the Safe mode while the computer is unable to boot. You can follow these two methods to enter Safe mode on your PC successfully.
Entering The Safe Mode Through Windows Recovery
When your computer is not able to boot, it may ‘hang’ many times. From there, you can force your laptop to go into safe mode. You can do this by interfering with the boot process at least three times. This will automatically trigger your laptop to go into Windows recovery. Check out the following steps from there onwards.
- Click on ‘Choose an option‘ on the Windows recovery.
- Then you have to click on ‘Troubleshoot‘.
- The next step is to choose ‘Advanced options‘
- Finally, click on the ‘Startup Settings‘.
- After this, you can reboot your PC into Safe Mode. You can do this with the internet connection turned on and off. Either of the options will work for you.
Entering The Safe Mode Through Windows Recovery Drive
If you are not able to access the Safe Mode, it’s time to develop a Windows USB recovery drive. The recovery drive can be accessed by tapping the ‘F8’ button while booting. This recovery drive consists of the Windows recovering environment. To create a recovery drive, you need a USB and a Windows PC with a minimum of 513MB storage capacity.
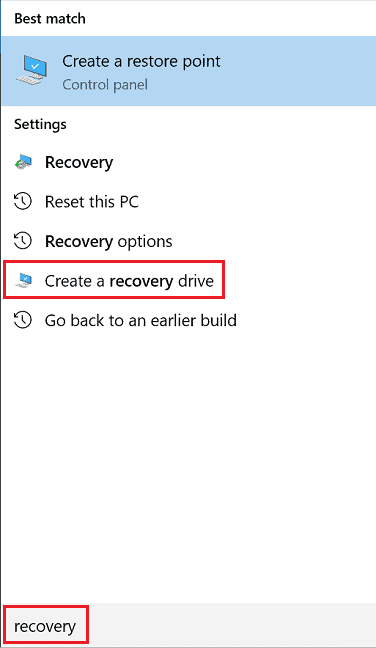
If you are planning to create a backup for the whole system, you require 16GB of storage space. You have to launch the ‘Control Panel‘ and then select ‘Create a recovery drive‘. After the recovery drive is successfully created, you’ve to turn on the flash drive as bootable. After the USB drive is bootable, you have to insert it and restart your PC.
TIP: Go to the search box near the Start button, and type “recovery”. In the list of results, click or tap “Create a recovery drive“.
A Malware Scan Can Also Help
For a lot of computers, the malware can be the main culprit behind the starting up issues. There is a common way of dealing with such malware problems. All you have to do is install an anti-malware program that can help you troubleshoot the booting problems. There are a lot of brands that offer free anti-malware programs.
You can use the BitDefender or AVG’s rescue CD. After imaging the anti-malware onto a flash drive, you can insert the drive and boot the computer. If your computer is already set to boot from the rescue drive, then it will automatically initiate the AVG rescue environment. After this, you can run the malware scan.
Use A Third-Party Software
If you are constantly failing to fix your unbootable PC, then perhaps you should use third-party software such as the Boot Repair Disk. The most challenging part of remedying an unbootable PC is figuring out what’s causing it. When your laptop is unable to boot, it isn’t easy to dig deeper into the source.
A third-party utility can be helpful to crack into such issues. Such rescue disks will automatically figure out the source of the problem and fix it. All the testing and fixing procedures are carried out by the software on its own. Though it does not guarantee a remedy, it’s worth a try.
Factory Reset
The factory reset is usually the last option you should resort to. At this point, you might have to get a bit harsh on your device. This is one of the destructive and challenging options to repair your PC. Apart from a factory reset, the more complicated options are restoring and refreshing your device. Each of these methods has its pros and cons.
You might lose some data and apps while doing this, but you can choose to keep a few files. A factory reset process will restore the PC to the default operation state. But, you must opt for a factory reset only if other methods fail to work.
Laptop Booting/Starting Issues: Successfully Fixed!
Solving a booting problem on your laptop can be a daunting task, especially if you are not a techie. To avoid future issues, you can use a 16/32GB USB drive to develop your drive’s recovery system. For some devices, the boot problem won’t end there. Your laptop may also be struggling with HDD/SSD issues.
We hope that this article could successfully guide you to fix starting up issues on your laptop. Don’t forget to try all the ways out before opting for a factory reset. Troubleshooting a laptop that is not booting correctly requires one step at a time. This guide will help you save some money and bench-time before taking your computer to a repair shop.