
Is your Windows laptop not shutting down? A computer that is not turning off is more frustrating than a computer that is unable to start. There can be many reasons why your precious laptop is not turning off.
Also, many people overlook the problems that are going on with their laptops while turning them off.
Thankfully, we have found out some tried-and-tested methods of turning off your laptop safely. Also, you don’t need to be a tech-genius to implement these methods.
The power-off problems can be both due to software and hardware issues. Read on to know some easy fixes for turning off your laptop safely.
Why Your Windows Laptop Is Not Shutting Down
A laptop that doesn’t shut down is like a baby that is throwing tantrums to sleep. You have to take action right away to save the consumption of your laptop and CPU.
There can be multiple reasons why your laptop is not starting. We have based our articles on fixing these issues. You can take a look at all the reasons for this type of situation:
- Fast startup
- The taskbar is not functional
- The windows are upgrading
- There are many unwanted files running
- Windows system files
How To Fix Laptop Not Shutting Down?
This is a prevalent and frustrating problem, although it is effortless to tackle. Before you jump to any of the methods, check out if any updates in the process are causing this problem.
Typically any Windows updates tend to take a few minutes to many hours. We recommend waiting for at least 3 hours if the update process is going on.
If the update has fully completed and your PC is not shutting down, you can try the following ways.
Check The Application And Software That Start Automatically
Some applications and Softwares cannot be easily turned off when you ultimately want to shut the computer. This can be the core issue of why your PC is not shutting down. These applications generally run without permission in Windows Startup.
You can control and turn these applications to prevent them from automatically running. This will eventually increase the starting and shutdown speed. These steps are a bit complicated than other methods. We have mentioned all the steps below to disable such applications.
- First Step: Open the ‘task manager‘. To open the task manager, use the search near the start menu or right-click at the taskbar. Or use the shortcut, press ‘Esc‘, ‘Ctrl‘ and ‘Shift‘ together at the same time to open the task manager. The next step is to click on ‘More details‘ to open the full menu.
- Second Step: When the interface shows up, you should choose ‘Startup‘ to view the startup tab.
- Third Step: When the startup tab shows up, you have to go through the list of applications. You can click on the disable option for all the apps you do not need. You can disable it by right-clicking on the app and chose the ‘disable’ option.
More: Where Is Windows Key In The Keyboard And All Shortcuts List
Disabling The Fast Startup
This is the startup mode in the Windows operating system. A windows computer that has a fast startup will start faster by 30%. An older windows operating system has a much slower startup process. Many of you don’t know that a fast startup is a mix of Microsoft’s logout function and sleep mode. This can sometimes hamper the shutdown process.
This can be the root cause of the shutdown and power on issues running on your laptop. You can disable the fast startup by following some simple steps. This way has proven to work for most laptops:
- First Step: Find the ‘Control Panel‘ and then look for ‘Hardware‘, then ‘power options‘ After you find the power options, click on it.
- Second Step: At the right, click on ‘Choose what power button does‘
- Third Step: Under the power options, choose ‘Change settings that are currently unavailable.’
- Final Step: Untick the ‘Turn on Fast Startup‘ option.
More: How To Fix A Laptop That Windows Is Not Booting/Starting Up
Download The Latest Windows Version
Sometimes the remedy to the problem lies in the simplest of things. You can beat the shutdown problems just by ensuring that you have the latest Windows version.
Having the latest version of Windows can solve multiple problems on your device. Microsoft will send new updates to fix common bugs.
It would be best if you always kept checking for new updates. You may also have to fix the update process if it’s not working or getting stuck. Read the steps mentioned below to fix your PC if it’s not turning off after an update. If the update process is problematic, try to choose and apply the troubleshooter as an administrator.
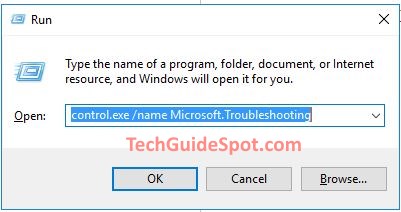
- First step: press the ‘Windows‘ key, plus ‘R‘ key on your keyboard.
- Second Step: The next step is to enter ‘control.exe /name Microsoft.Troubleshooting‘ in the on and click on ‘OK.’
- Third Step: It’s time to shut your computer once again.
Force Shut Down
Force shut down is the simplest and the least complicated way to fix a laptop that is not turning off. Follow the steps mention below to carry out a force shut down safely. The steps are straightforward and easy to follow:
- First step: You have to press the power button for a long time until the laptop finally turns off.
- Second step: the next step is to disconnect all power sources for at least 5 minutes.
- Third Step: The last step is to restart your computer and then turn it off normally.
Perform A System Image Recovery
If you have used Windows snap-in tools to create a system image recovery, you can use it to restore your computer. There are more intricate steps in performing a system image recovery.
The user can follow these steps to initiate the system restore. In this article, you can learn to make a system image recovery successfully.
- First Step: Open the ‘Start‘ menu, click on ‘shift,’ and press ‘restart‘ to enter the Windows Recovery Environment (WinRE).
- Second Step: After that, you have to click on the ‘troubleshoot‘ button. Next click on ‘Choose an option‘ and then finally ‘Advanced options‘
- Third Step: You have to choose the latest system image or image backup. You have to click ‘Next.’
- Fourth Step: Your Pc will further guide you to carry out the restoring process. When the warning window pops up, you should click on ‘Yes.’
More: Laptop Is Not Starting? Follow These Steps And Fix It!
Try To Fix The Windows System Files
After installing the updates on your Windows PC, check if your PC can shut down. If the shutdown problem persists, you have to try alternative methods.
You have to repair Windows system files. Sometimes the files are corrupted, due to which the system won’t shut down. You can follow these steps to repair the files.
You have to wait patiently after following the steps until the verification process is fully complete. After that, you can see whether your Windows PC is shutting down or not. This process is easy-going, but you need to be a bit patient.
- First step: Press the ‘Windows‘ key and the ‘R‘ key together. After the screen changes, enter ‘cmd‘, press ‘Shift‘ and ‘Ctrl‘ key, then click on ‘OK.’ This will allow the ‘command line‘ to run as an administrator.
- Second step: at the command line type ‘SFC /SCANNOW‘ and let it run, hopefully, it will repair the Windows system files.
Wrapping It Up
We hope that you were able to find a method to fix your laptop that is not starting. These methods are relatively easy and work in most situations. You should only reach out to a professional repair service only if none of these methods are working.
Also, you must take proper steps while turning on and off your laptop the next time. These problems only arise after the laptop is being used incorrectly for a long time.
Some computers may take forever to shut down because there may be programs still running in the background.